Solar Cabling
Do you really need more solar panels, or is your cabling not up to scratch?
You've calculated how much power you should be able to harvest from the panels you have and you've done everything you can to make sure you're getting the most out of your panels and they're not damaged. You've tested each panel, and whilst they're not putting out as much power as you'd probably like (they seldom do), they're all putting out roughly the same amount of power.
Maybe it's time to look at your solar cabling.
Cable to join solar panels together
Most rigid solar panels come with 10AWG wire from the box at the back of the panel, which is 4mm square auto cable.
For a solar installation on an RV, 6mm auto, also known as 9 AWG wire, is sufficient to extend a set of solar panel cables.
Solar panels to junction box
We recommend using a waterproof junction box over the hole in the roof where the solar panel cabling will enter your RV. We connect all the positive cables to a positive link on one side and all the negative cables to a negative link. Cable glands and quality sealant are used to waterproof the entry holes into the junction box and also the entry hole into the RV.
Junction box to solar controller
From the positive and negative links, you need to deliver the power from your solar panels to the solar controller. Because you are now consolidating all that power from those panels, you will need thicker cable from here on in.
We use 6B&S cable (13.5mm square) for every 40 amps of power we need to send to the solar controller.
Circuit breakers
The 6B&S cable from your junction box should be sent to 40A circuit breakers designed for this job, before going to the solar controller.
Not just any old circuit breaker will do - AC circuit breakers will fail when used with DC current. DC produces an arc when the contact is opened and can either weld the contacts together so that they can't open, or catch the plastic casing on fire. In a 12V solar array producing 40amps, when the panels are anywhere up to 18 volts VMP, the current across the contacts is 720W. The higher the voltage, the longer the arc can be maintained. A series-connected solar array for an MPPT solar regulator can be over 100VDC at that same 40 amps, so you now have 4,000W and a huge arc is possible. We use DC circuit breakers designed for up to 500VDC @ 40amps - made to do the job safely.
MC4 connectors
The plastic surround
Most installers will use the existing connectors already on the 4mm cable coming from the solar panel which they call MC4 connectors:

The actual connector
But an MC4 connector actually looks like this inside all that black plastic:
![]()
The connector and spring clip
Sitting inside the female half of the connector, right at the mouth of the female half, is a spring clip which is meant to give a good connection between the male and female pins. This is important to ensure that electricity can flow from the solar panel, along the solar cabling, to the RV.

However, this spring clip - as in the case in the photo below - often gets pushed up inside the female connector, where it fails to make any improvement to the connection between the male and female halves.
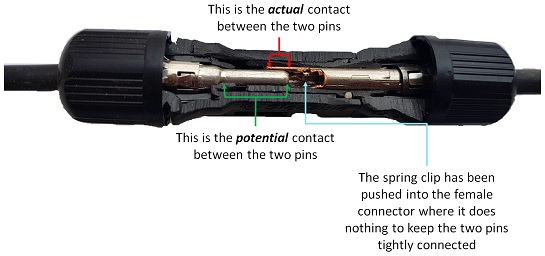
You can also see from this cut-away photo above that there's precious little of the two halves of the MC4 connector that actually make contact. One third of the possible connection is actually made, and very poorly at that. The spring clip has also been pushed up inside the female connector and so does nothing to improve the connection between the two halves.
How we do it at T1 Lithium
At T1 Lithium, this is how we connect 6mm auto cable to the 4mm solar cable coming from each solar panel:
- We remove the MC4 connector from the black plastic shell.
- If needed, we recrimp the existing MC4 connector or we replace the MC4 connector entirely if it is damaged or the connection was so poor that the cable broke.
- Then we crimp them onto the solar cable.
- The same process is done to the 6mm auto cable that we're going to use to connect the solar panels together.
- Before the MC4 from the 4mm and the 6mm are connected, we thread some heat shrink over, then we join the two connectors. Because the MC4s are now free of that useless plastic, the male pin can be inserted all the way into the female pin.
- Those connected male and female pins are then soldered together - NOT the wire into the MC4 pins.
- Finally, we seal the heat shrink over the connection so that it's insulated against accidental shorting and to keep moisture out.
Sounds a whole lot better? Yes it is.

A simple way to test each individual panel without needing a multimeter.
There's only so much power you can push down thin cable. By using substandard cabling, you not only degrade the efficiency of your power system, you also risk a fire in your RV.
In order to know whether your cabling is a problem, it certainly helps to know how much solar should be harvesting.
There are quite a few things you can do to make sure you're getting the most out of your solar panels.